Christmas in July | Imagine Crafts and Stencil Girl.


Welcome to
Day three of the
StencilGirl Products & Imagine Christmas in July Blog Hop!
Team StencilGirl and Imagine Artists in Residence are getting creative with Imagine Products and StencilGirl Stencils!

Sit back and enjoy a fabulous range of projects!
We hope to inspire you!
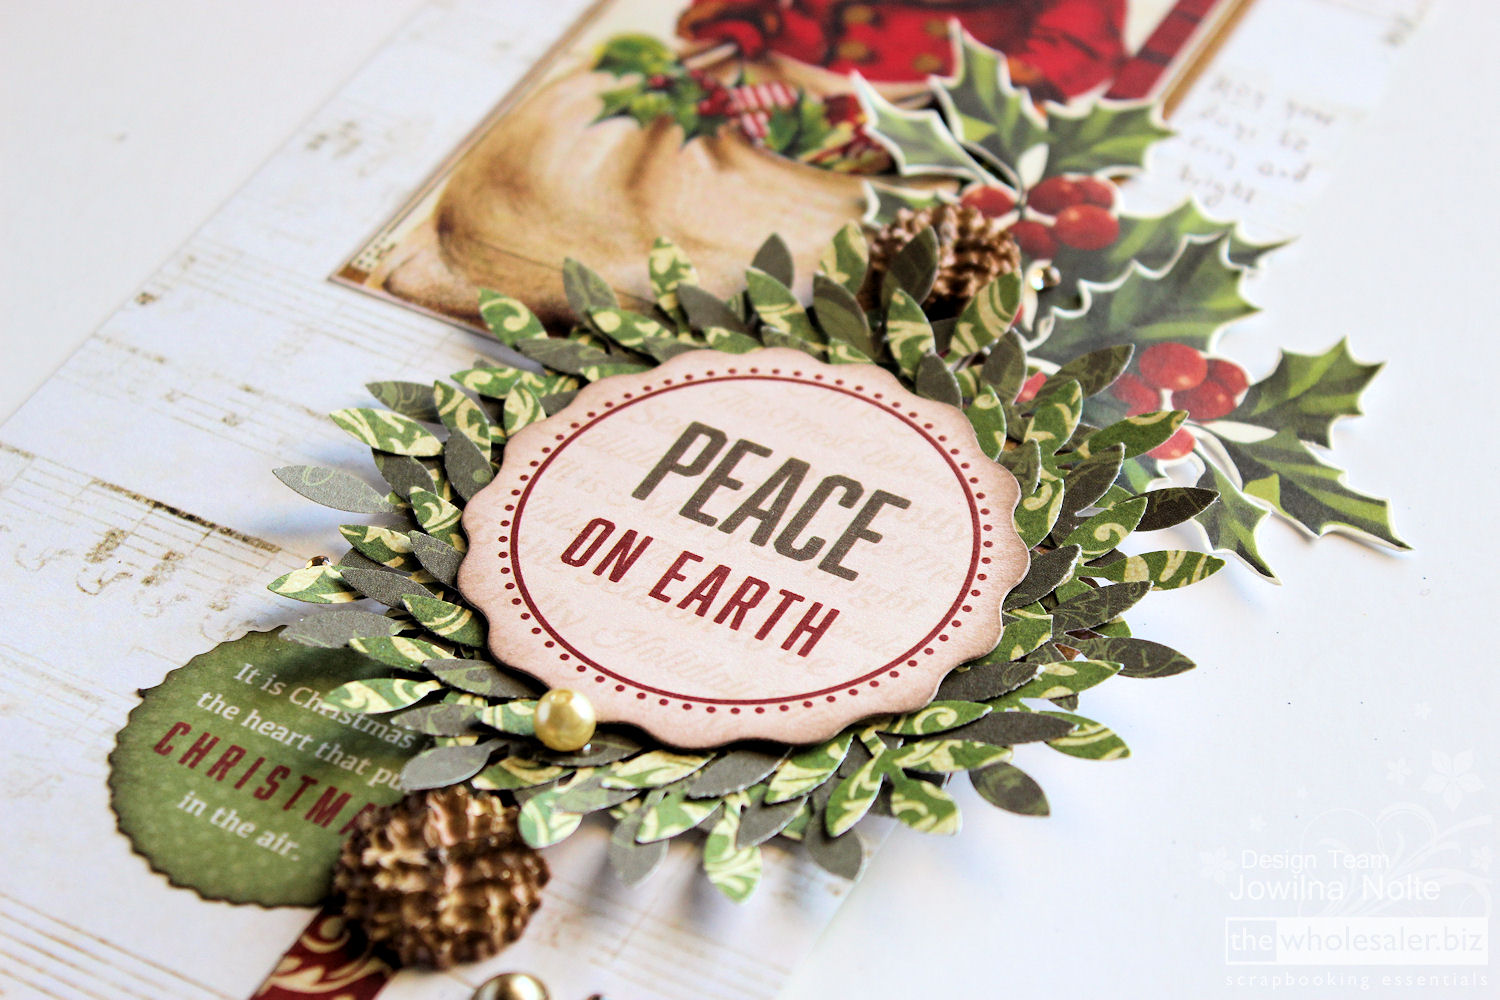
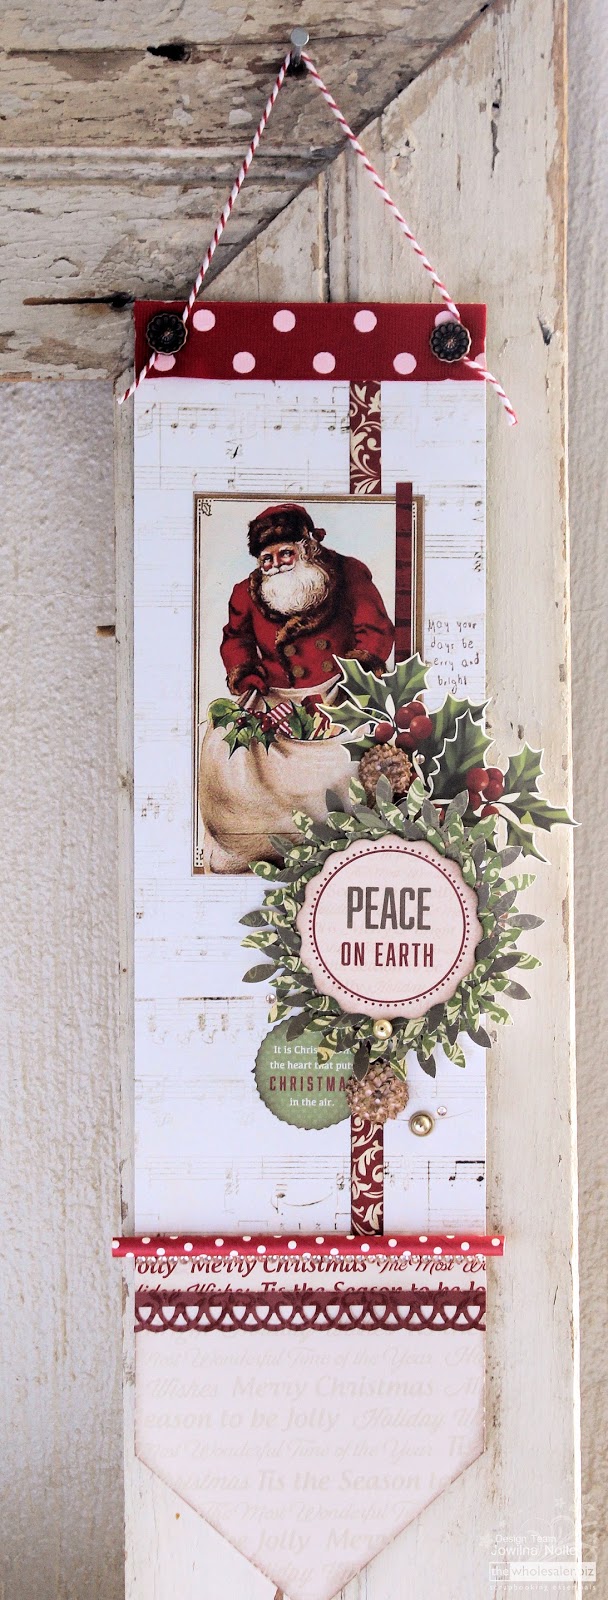
For my card I used the beautiful Pine Cone stencil on my background using several inks for a fun look. I Misted through my stencil, then used the stencil to stamp a second card. Once the ink was dry I used a pine needle stamp and stamped some additional images, and added some pops of red berries.
  
step 1 - Use 2 different colors of Fireworks! sprays and mist through the Pinecone stencil.
 step 2 - While the stencil is still wet, carefully lift it up, flip it over and stamp with the stencil onto a second piece of cardstock.
 step 3 - Once the ink is dry, use a pine needle stamp and Spanish Moss Versafine ink pad and stamp additional images onto your card.
 step 4 - Add some color by making red berries using irRESISTible Pico embellisher. Leave to dry and then assemble your card.
Stamp Merry Christmas onto the front of the panel using Versafine.
And there you have 2 quick cards using one single stencil with two great effects.
Head on over to Terry's blog to complete the blog hop! And thank you for stopping by!

July 23:
StencilGirl Talk
Gwen Lafleur
Carolyn Dube
Carol Baxter
Mark Melnick
Jowilna Nolte
Terre Fry


What would a Blog Hop be without a GIVEAWAY??!!!

We'll be picking one lucky winner
to receive $100 in Gift Certificates – a $50 Gift Certificate for
StencilGirl Products and
a $50 Gift Certificate for
Imagine Crafts!
Take your time and visit each blog showcased July 9, 16, & 23 and leave your comments.
The more blogs you comment on, the more chances you have to WIN!
One comment per blog please.

You will have until Saturday, July 30th at 11:59PM Central Time to leave your comments.
The winner will be notified by email and announced on
StencilGirl's Facebook page on Sunday, July 31st.
Thank you for playing along and hopping on over to our blogs - we hope you are inspired I know I sure am! Now to get some more of these gorgeous StencilGirl stencils!


around here...

Around here things have been hectic, crazy, scary but mostly exciting.Since the last time traveling around the country teaching 300 odd ladies at Scrapbook Studios event things have been interesting around here. I was slapped yet another LOW blow by the industry, which turns out to be the biggest ever blessing by God. You know the feeling when God shuts a door HE alone opens an even bigger one! Well there you have it! I am blessed even more than I can ask or dream of....well I can dream bigger and so i am doing just that!

One of those exciting things is the release of the new Lady Pattern Paper papers in Egyptian Gold [Limited Edition] and Dazzling Blue [indeed]. I asked Bernie for a navy but what she gave us is the prettiest ever blue that is really versatile, and maybe one day she will do a navy but for NOW i am in love! And those gold hearts, well have my heart!
I was excited to photograph and play with these papers before release day and am always so honorued and excited to a part of the process.
How gorgeous are these golds? Best I stock up on some more before they are all sold out!

Then there is this that I am really excited about...but you will have to wait just a little longer for the reveal!

and then there is the Stencil Girl Christmas in July Bloghop that is happening tomorrow...so watch this space and hop along as you can be a winner too! Until later this weekend....
I am off to have a great teaching weekend filled with loads of creativity!


Kraft Essentials Double Page Layout.

What does Kraft Essentials, travel paper and Spar have in common? Well if you live in Gauteng then it all comes together in a double page layout about a horse. Yes strange but true, and it just goes to show how versatile the Lady Pattern Paper range is.
For this double page layout was inspired by the beautiful photos of Leo and Julianna. I drew inspiration from the purple and blue in the photos to use as my accent colour on the layout. For the rest it was a natural colour selection in the Kraft Essentials paper and then I found this gorgeous travel paper that worked perfectly in colour, pattern and texture. All of these elements together with a few embellishments I found at Spar and you have a gorgeous layout with interesting elements.
The kraft paper with blue stars on not only worked perfectly with my colour scheme but the tiny star pattern also compliments the theme and message of the layout. A few extra elements like the cut out sentiment strip sits perfectly on top of the different patterned papers adding another dimension.
The cute little paper clip elements were found at our local Spar. How funky are they? And perfect to add to any project for that extra pizzazz factor.
As part of my title, I punched a circle out of scrap paper, added a “L” rub-on and then dressed it up by adding a stamped paint circles and pencil scribbles all around it. This is such a simple but effective way to use up those older rub-ons in your stash.
 To create flow I added paint splats in different colours to make all the patterned papers seem like one. The paint splats are the unifying element that tells your eye everything works together as a whole. A nifty little trick for unifying elements.
Another little element from Spar is this post it note that I altered by adding some stamped wording, sewing and embellishments.
Stencilling, stamping and buttons finish off my layout perfectly – adding some dimension and colour but not distracting too much from the photos.

And that’s how you can use a whole bunch of different elements in a supporting act together on your double page layout with the gorgeous Kraft Essentials paper from Lady Pattern Paper.

StencilGirl & Imagine Christmas In July Bloghop.

Welcome to StencilGirl and Imagine Christmas in July 3 week long Bloghop!
Yes you heard me 3 inspirational weeks of Christmas in July using Stencils.
If you haven't been playing along, hop on over to the StencilGirl blog and start hopping. Rememebr you have to be in it to win it!


What would a Blog Hop be without a GIVEAWAY??!!!

We'll be picking one lucky winner
to receive $100 in Gift Certificates – a $50 Gift Certificate for
StencilGirl Products and
a $50 Gift Certificate for
Imagine Crafts!
Take your time and visit each blog showcased July 9, 16, & 23 and leave your comments.
The more blogs you comment on, the more chances you have to WIN!
One comment per blog please.

You will have until Saturday, July 30th at 11:59PM Central Time to leave your comments.
The winner will be notified by email and announced on
StencilGirl's Facebook page on Sunday, July 31st.

Christmas in July – Peace Pennant.

Welcome to Christmas in July – the month of good intentions of getting ahead of the festive crazies and prepare for a magical and peaceful time during the holidays. And with all the gorgeous Christmas Kaisercraft releases we can expect this year, it sure is going to be a glitzy affair! 

One that I am really excited about. I love the festive season mostly for its wreaths. Yes I am that girl that can have a million wreaths around the house all years long and still love them come Christmas time. So what better way than to create a little festive magic with a miniature wreath on a pennant that can welcome guests at the front door or be used on the fire place, heck anywhere that something can hang – this peaceful pennant can bring good cheer to all who sees it.
I started off by using the beautiful Silent Night Christmas paper to create a pennant base. Then added paper strips and punched borders to complete the look. On top of the pennant is a cut out Santa, more paper strips and a beautiful pennant created from the patterned papers and collectables pack.

step 1 - Punch a selection of leaves from the Kaisercraft Silent Night paper.

step 2 - On a pre-made circle element, add a circle of Tombow Mono Multi adhesive and place the leaves in a circle all around it. I used two different patterns and shades of green of leaves to create interest.
 step 3 - Add Tape Wormz foam tape to the back of another circle element from the collection pack.
step 4 - Adhere the element over the leaves on the base element. The dimension gives the wreath a beautiful 3D look.
step 5 - Create the pennant from a base paper. Add a strip of high tack tape to the top of the pennant.
step 6 - Adhere a strip of ribbon to the tape for a really permanent hold.
I hope that you’ve enjoyed the first of the Christmas in July projects that will be running over the next month.

Popular Posts

Like us on Facebook

Flickr Images