lightbulb moments for big and little kids.

i love it when simple ordinary things become an idea and turn out totally awesome. as crafters/hoarders there is a reason why we never throw things out right? right! 'cause there's always a light bulb moment. to make things out of old things and strange things...as was the case with this little project i recently did for a local television show recently. when my car went for a service and the little rear light bulb was replaced - it stayed in the garage for over 2 months before it was put to good use. add 2 other totally useless (dunnu why i bought them) light bulbs, some wood glue and glitter and there you have it. a totally rad new way of getting some 'up-sized' Xmas lights around the house as part of your decorations.
these are so easy to make. i simply squeezed some wood glue directly onto the bulb and spread the glue using my fingers. the shake on some glitter and let the bulb stand (and yes they can) upright on a smooth surface and leave to dry. shake off the excess glitter and let your light shine! the thing is that i didn't even use my expensive glitter - but instead opted for the kid's version - a much coarser version.
the paper bauble consists out of punched circles glued together to form a dimensional paper decoration. easy enough for the kids to do and nice enough for grown ups to want to hang on the tree.
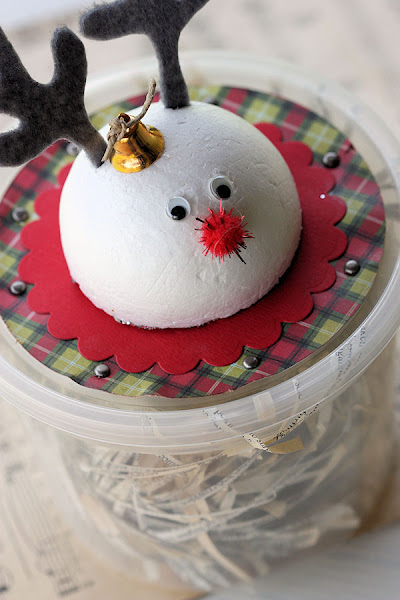
this little reindeer fellow was made out of a Styrofoam ball cut in half. it was placed on a base made out of different paper layers and then attached to the lid of a plastic container using glue and brads. the reindeer antlers were cut from grey felt and glued inside small slits in the Styrofoam. the rest is some googly eyes, pompoms and little gold bell. the inside of the tub is filled with strips of old book paper that will hide a little gift.
an old coffee tin becomes a quick gift box. simply cover it with decorative paper, add a ribbon and some brads. the top is decorated with the same 'circle' paper bauble made as before. this time it is adhered to the lid using glue.
hope you are having a creative festive season. i have been sorting and purging some old products that is in need of a new home...and cleaning and re-organizing again! truly a never ending job...

secret santa bird house cracker.

last night we had our annual scrapping Christmas dinner. the bunch of regulars including Christine who came from Prague for the big event, old friends and new friends from Bulgaria we literally represented the entire planet. it was so awesome to come together as friends and creative partners! we each designed a place setting for our secret Santa that had to include a hat, place mat, napkin, cracker and name tag. this is a small glimpse into my place setting...
my cracker of course could not be the normal - instead i used a postal tube and decorated it as the cracker. but let me tell you - it's not the easiest to open since the top and bottom gets sealed off with plastic lids....part of the anticipation of getting to a small little gift.
i covered the tube in old book paper and gel medium. the top features a small little bird house made by hand and decorated with moss (kindly donated last year by my friend Niki), glitter, old sheet music, vintage images, bling and charms.
and don't forget the silk ribbon! the base of the little bird house are 2 wooden frames glued to each other - and really really old. they are one of those oh my why do i have these 'cause i will never use them things in my stash - well they were meant to be...
the place mat is a piece of wood painted in a layer of dark brown craft paint, then a layer of cream. the reindeer was drawn onto the wood, some silver leafing added and then a layer of brown paint. i then sanded the whole bunch to distress it and then added a layer of antiquing liquid oil.
the bird house template is an old favourite by PSX (personal stamp exchange) from way back when. they made the absolute best rubber stamps with stunning images...but sadly not around anymore.
i love the vintage antique feeling of this project.
the front is a chipboard star covered in dimensional glaze and glitter, a large button and a large diamante to finish off the center. two silver leaves from Prima adds some texture.
and then there's the silver bauble ! aah yes the bauble that took 4 hours to complete as i very patiently sat and added each sequence piece with a pin into a Styrofoam ball. these are my favourite baubles to make. i made my first one for a Christmas photo shoot in 2005 and have loved making these for all kinds of occasions. a great go to craft doing in front of the TV if you will.
hope you are having a peaceful week! thunder is roaring in the background outside as i type...here's hoping and praying for much needed rain and relief from the pressing heat - and a couple of dogs at my feet scared of lightning...so logging off!

4am wake-up call.

so for today here's a glimpse at what got me up at 4am to leave home at 6am to get to the urban brew studios in JHB at 8am studio call. as usual i over planned and prepared but with good success i think. it has been a long morning and i am ready to take a nap.
sitting around for hours on end doing nothing is quite frustrating...but such is a day in the life of famous people like the one below...and many others i shared the day with like Elvis Blue, Tobie Cronje, Annamart v d Merwe, Carmen, Ed and and and....
i am glad it's all over and done with....i get very nervous doing these kinds of things. but it's just another thing to cross off my bucket list. i must say i have crossed off many things off of my list in the last 6 years.
i have so many projects done and waiting to be completed and shared with you all. also in the pile to be photographed is my December daily album i have been working on. for the first time i have chosen to skip tim's 12 tags of Christmas - ooh gasp! yes i may include some ideas in my other project i am working on. instead i have chosen to do something different - a look at things happening in and around my life in December. i am not a fan of mini-albums but this year seems to be different like lots of other things. hoping to share my album sometime soon. i hope you are slowing down somewhat in daily life and being creative to feed your soul.

moving right along.

so what do you do when life throws you a bowl of sour lemons ...why you grab some stuff and get cracking on some secret Santa creativity!
yeah that's right - i make stuff - i get more creative than ever before - i feel better - i let go - i forgive - i move right along. don't let life hold you back from beauty today - let go and create!
be blessed in everything you do today! thanks for stopping by - i give you thanks abundantly!

my version of honeycomb.

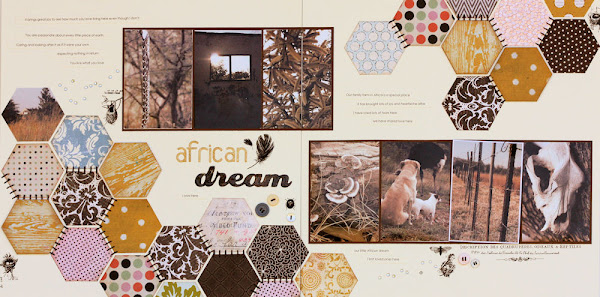
so things have been quite busy around here - still! in between getting the last of the class layouts and projects prepared for this year and painting more furniture, my calendar has been filling up quickly for next year which is a good thing. i am thankful! thought i would share my version of the honeycomb - a favourite layout done last week. with scraps! my ultimate enjoyment in paper crafts. so what can i say - i love scraps and lovingly care for them amongst my other supplies. these were all scraps cut into 3x3 inch squares and worked perfectly to trace my template on and cut out. they are far from perfect - like life and just how i love it! the layout is finished off with simple strips of journaling, rub-ons and a title. oh and don't forget the buttons.
for some of the hexagons i went back afterwards and added a second raised layer using a different piece of scrap paper - adding more interest and dimension
my title is created partly using aancient sheet of basic grey lettering and half cut using my slice machine. the word 'dream' was cut using 7gypsies patterned paper and then glazed once it was stuck down. it always amazes me how people can first glaze their words and then trying to get it to stay flat (while it curls madly)while drying. this is not the right way - adhere everything to your layout first and then add your layer of glaze last - move your project to the side and walk away!! trust me - you will learn to love glaze and your projects more...
this half sheet (scrap) of 7gypsies rub-ons have been lying around for ages! and finally they found a home. i am always amazed at the quality of their rub-ons. even after years of floating around without their protective sheet at the back - they glide on like butter. just wonderful!
thanks for stopping by! i hope you are having a creative week and things in your neck of the woods are slowing down a bit! blessings and love...

class kits for sale.

i have 2 of these class kits up for grab in the for sale box. a fun layout in bright colours that can work for boys and girls...simply turn the paper around to give you the option. this kit teaches you some new and exciting techniques using alcohol inks, paint, distress inks, perfect pearl mists and crackle paint. **please note that the products needed for the techniques are NOT included in the kit and can be purchased separately from your nearest scrapping store. *only for south african residents please.
winged chipboard car featuring alcohol inks, distress inks and perfect pearl mists
decorative border cut from patterned paper
kit price R200.00 ex postage and packaging
with full instructions and colour photo included
e-mail me if you are interested jowilna at scrapcouture dot co dot za

finally something to share.

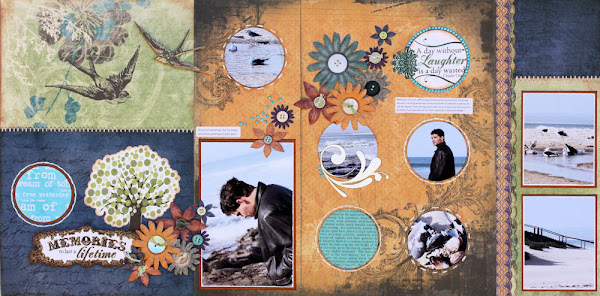
this past saturday we had an awesome event at emperors palace in gauteng. forever memories ( a local distributor in south africa) had a nice group of ladies that got together for a full day of scrapping, chatting, laughing and off course a stunning lunch in between all the creativity. i won't lie and say i am totally in love with all their products BUT they have some awesome tools (the best corner rounder and definitely the best circle cutter) and their new paper ranges are very very nice. i got to work with this beautiful range in greens, blues and yellows for my layout. the ladies enjoyed themselves a lot and we even had a couple of gents in the class too.
some of the beautiful paper flowers included in the kit. they work really well on their own or dressed up with buttons and thread.
beautiful chipboard swirls finish off a circle cut out of the patterned paper with a photo behind it
their huge assortment of stickers gave the scrappers an opportunity to alter them and totally change the look. for this sticker we did a bit of fancy cutting and inking to give a 3-d look.
i have been quite busy with furniture painting and restoration and my little side business is taking off nicely...well so i hope. then there's the telkom internet saga - when will south africa actually have a decent provider with cheap internet. the lack of actually having internet for a couple of hours on end is really frustrating. moving to canada is very very tempting at this stage...besides it would be so good not to have to deal with the current heat here. enough of that though - hope this inspires you for a day or two. thanks for popping in. i am hoping to share some xmas cards if only i can get a decent photo or 8....

a scraplifted layout .

it's been a hectic last couple of months and it seems like time is flying by even faster than normally. but i have been doing a lot of scrapping none the less and have even scrap-lifted a couple of layouts that have caught my eye. this layout was inspired by Jeanette from scrapbook den. Jeanette offers some stunning class with the occasional layout and card making class taught by yours truly at the shop at the beginning of each month. i changes up the layout to suit my style...but regret not having done some misting on the background now. any how...hope you feel inspired to get creative this week.
for my glitter title i cut the word together using my slice machine out of brown card stock. i first adhered it to my layout and then covered it in a layer of dimensional glaze. then sprinkle the glaze with glitter and leave it to dry for a good 15minutes before shaking off the excess glitter. a perfect glitzy title to get you into the holiday mood...
the little flower was embossed onto cream card stock using clear embossing powder. i then added colour using distress stains and misted it with water and letting it dry naturally. **remember that letting things dry naturally always gives a way 'cooler' look than drying it using a heat gun.
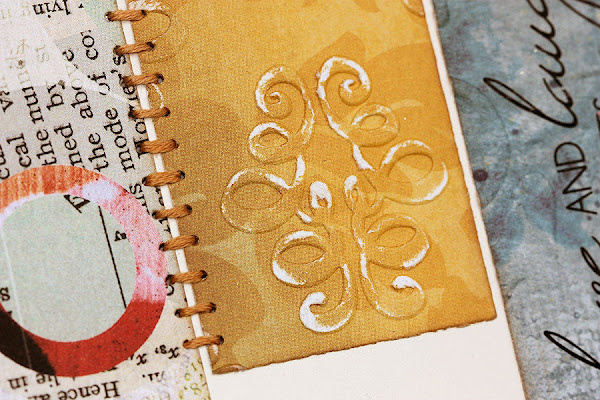
most of my strips i embossed using my cuttlebug machine and some embossing folders. i sanded some of the areas to give a worn out look. and don't forget the sewing on the edges for some added texture and colour.
some old PSX (personal stamp exchange) stickers came in handy. i used some glitter glue to add sparkle and change the stickers up a bit.
i can't believe my little pups are 4 years young...they fill our lives with love!
thanks for popping in today -hope you have a wonderful week.

chandelier make-over.

so this morning i finally finished the black/green wrought iron chandelier make-over for my client. what a long haul this one was...a whole four days of cleaning of years worth of dust and grime and then lightly sanding and getting rid of gunk and dust and loose flakes before i could actually start the process. so as i said before i am so bad at taking before and after pics - so yes you guessed it no before pic here, just the finished lady in all her creamy glory.
the black rope wrapped around strategic points was a headache at first, and then i simply embraced it as the paint took to it eventually leaving it slightly distressed and totally matching the look of her dining room table i painted so i left it as is.
tada! here she still is suspended in my garage (which is also still unpainted)
i added some beautiful crystals here and there to 'french-en" it up a bit. it totally did the trick to turn this dark and depressing lady into a glorious swan filled with light and beauty. can't wait to see it all hung up in its spot. and i hope to get some pics then. hope you are having a creative weekend with some rest. thanks for popping in.

dina wakley stamps, glitz and paint splats.

here's a more recent layout where i simply had to use my new dina wakley stamps. if you're a stamper and love my style then you are sure to absolutely fall in love with her stamps and style of throwing paint onto paper. i wish my personality aloud me the freedom to do more of that and that it would be more easily accepted within the crowds...i guess it is just too unorganized and free for most people who love to be in control and perfectionists.
i used some of the new glitz girls paper ranges combined with some old 7gypsies, october afternoon and mme. i loved how it turned out - the blue and yellow with a hint of pink. the photos are a quick recap of the year 2011 so far.
here's a bit of that hand coloured silk ribbon again.
paint splats with an almost dried up paint dabber from ranger - whats with that? i hardly have it for a couple of months. i think it's time to call it quits with all the other stuff and stick to inks as clearly their paints aren't working out for them. but this is just my opinion.
and here she is...dina wakley in all her glory stamped onto a piece of yellow patterned paper. it says i am uncomplicated, free, happy with myself, content in what i do, unaffected by the masses and what they think, i am me. i am just going to have to get myself some more of these beauties. thanks for stopping by.hope you have a wonderful weekend planned. my day is filled with some project deadlines, a chandelier that needs to be completed for a customer and some down time this weekend.
supplies
background cardstock by african dream house brand smooth
patterned papers by glitz, mme, october afternoon, 7gypsies
stamp by stampington for dina wakley
ink by tsukineko
stickers by glitz
paint by ranger industries
silk ribbon by may arts
distress stains by ranger industries
other postage stamp, thread, diamante,
sketch by let's scrap

card camp recap.

it's been almost a week since our annual card making retreat and i am struggling to get into routine again. this year seamed so different and tiring - although i enjoyed it. things change every year and some for the good and others not. this year we had loads (90%) new girls attending camp. what this tells me is that the regulars are struggling and finding it hard to budget for camp which was also visible in sales. it may only be my observation but one none the less. every year i make a something special as my project - other than a card that is. BUT this year even i opted for a card which meant that i actually stuck to some sort of budget. and although there seemed to be some disappointed ladies everyone loved the cards too.
we did some funky backgrounds using distress stains. easily one of my favourite products to be released this year. although an old technique, out of 75 ladies only 1 had done this technique before and not with this new product or on paper. so all in all a good 2 days of informative teaching to a bunch of eager learners. today i am sharing the card samples with you as i prepare the step x step photos which i hope to share tomorrow God willing.
card sample 1 and a close-up pic of the ribbon we coloured using distress stains. i am such a snob when it comes to ribbon - so for me to use ribbon on a project it has to be silk at the very least. the colour and texture you can achieve is simply amazing.
card sample number 2 - same technique but different colouring.
the effects is simply amazing and even better in real life than in the photos.
thanks for popping in. stop by tomorrow for the technique sxs and some more samples of using distress stains on your cards and layout.

heading out.

i'm heading out of town for a couple of days to teach 70 plus ladies at our annual card making camp. every year i teach something different than a card BUT this time around i actually gave in and am doing a fun little card with the girls. it features loads of techniques for them to explore - some old and some new using new products. i will be back next week with images of camp and of my card and some techniques to share using distress stains. hope you have an awesome weekend planned filled with loads of creativity. be safe and fill your days with love!

heat embossing card class.

i guess having started my creative endeavors in life with card making wasn't such a bad idea after all. it seems like people and scrappers in particular are catching onto the idea of using your scraps for cards and other projects, but also to the fact that cards are such a small area to decorate and anything goes. as with atc's the golden rule can also apply to cards - a background, a focal point and an embellishment and *tada* you have a good recipe for a card.
tomorrows card class over at sweet scrappins is chock and block overbook - so sorry if you missed out! the class was booked completely even before we had advertised or shown sneak peaks. anyways - here are the sneak peaks for those that are interested nonetheless. Thanksto everyone booking and interested.
the first sample shows loads of fun products to use in conjunction with each other - meaning that we forget the rules and totally disregard the fact that we combine different products from different companies together - oohhh and i know they hate that! but the fact is that together they create magic - real creative and artistic magic.
you may also catch a glimpse of a little UTEE and melt art thrown into the mix. i totally fell in love with the simplicity of this card. i used all my favourite products and techniques on a single card. simply yummy!
and yes we are combining patterned papers from 5 different manufacturers with loads of different looks all together! i love how the colours and textures just work together - the techniques add interest and pulls the whole look together. ok enough of that!
i am also so very excited to see the new sign board above the shop! a couple of months ago Carla asked me to redesign her blog header (ok maybe i offered some help). it turned out really cute and it totally captures the look, feel and personality of her and her little shop in Pretoria. so then she asked me to design her a new sign board for outside the shop - and apparently it is being installed and looks amazing! i can't wait to see it in real life - and will so add a picture when i get home later tomorrow! here's wishing you are creative weekend filled with love! thanks for popping in and hanging around!

wonderful web find.

so what interesting thing have you found on the web lately. with my newly acquired obsession of vintage furniture, old stuff, painting and distressing furniture i found this beautiful sign post ...it says it all! hope you have an awesome day!
xxx

sketch 268 - a week late.

only a week late with editing and actually getting this post up - wow a new record for sure. i recently hit another speed bump in life which slowed things down a bit...but not entirely a bad thing as bad things go. so this was last week's sketch over at scrapbook challenges. i again turned it into a double page to suit my style better - but i simply love the single page version too. so head over to scrapbook challenges to see the sketch and some awesome samples by the rest of the design team. these were really bad cellphone by my mom...but scrap-able and still a wonderful memory of Jonathan's 4th birthday.
the gold dots are made using an ancient making memories foam stamp set and some gold paint dabber from ranger - love the imperfectness of stamping with paint
more stamping with the awesome pink paislee stamp set
stars punched from coloured paper and adhered...these are really tiny - what was i thinking?
and more banners stamped with the same pink paislee stamp set in black ink and decorated with patterned paper. the ticket is by house of 3 and printed on archival matt (epson) and adhered to white card stock to firm it up.
well tomorrow is the start of a brand new week and another scrapbook challenges sketch so watch this space i will be back! we are just heading into summer here in South Africa and the stormy weather season is upon us. we have had some much needed rain and some nasty thunder and lightning which means half the dogs on the property are nestled real cozy on pillows in my lounge because apparently they are just as weary of thunder as i am. however i am thankful for the rain - less dust and a green lawn yeah! hope you had an awesome weekend. lots of love...

Popular Posts

Like us on Facebook

Flickr Images